LDCC Automation
Overview and Layout Design:
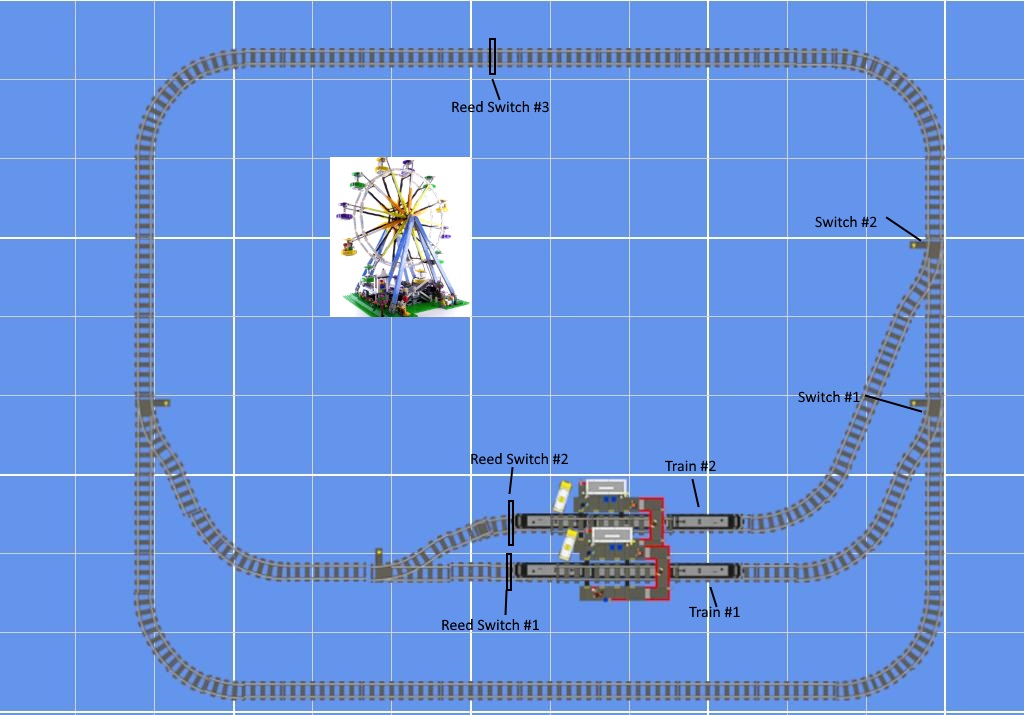
Using Not Quite C (NQC) and a spare RCX running the stationary decoder firmware, you can automate large layouts by starting/stopping trains, throwing track switches, or running other lego motors.Below is a diagram of how I set up a train display in 2017 for "National Train Day" hosted at our local Depot/Historical Center.

I also developed a custom train detector made out of a reed switch to detect the magnetic field of the Lego motor as it would pass over.
Walkthrough:
When the program first starts, it runs through a series of check to make sure the layout is consistent. It creates all the tracking variables, resets the track switches, etc.
Once the track is consistent, train #1 pulls out of the station and onto the mainline. It will then go around the loop a random number of times. Reed switch #3 is used to detect how many times a train has gone around the loop. When the train has gone its max number of loops, the program tells switch #1 to allow train #1 into the station. Once train #1 is detected by reed switch #1, the program tells the train to stop. Switch #1 is then reset. Train #2 starts, and pulls onto the mainline. Once again train #2 runs a random number of loops. Once its max loops has been detected by reed switch #3, track switch #2 allows the train to pull into the station. When train #2 is detected by reed switch #2, the train is told to stop, and track switch #2 is reset. The program then repeats until you tell it to stop. While the trains are going, the ferris wheel is also set to spin for 60 seconds, stop for 60 seconds, and repeat.
Equipment Needed:
- One RCX running DCC firmware (RCX DCC).
- One RCX running ACC firmware (RCX ACC).
- One RCX running standard firmware (firm0332) for the automation program (RCX CODE).
- Two automated switches.
- Two Lego trains with at least one Lego 9v train motor per train.
- Three custom reed switch train detectors.
- Handful of 9v wires and track connectors to connect all the RCX's and accessories.
- Automation Program
Wiring and Setup:>
Using the RCX DCC, take a Lego 2x8 electrical plate and place across all the motor outputs. Then wire from the electical plate to the mainline, and the two siding where the train platforms reside. Make sure all connections are the same way so you don't short anything. You need to wire all three tracks in this case because Lego switches will only pass electricity in the direction the switch is thrown.
The next step is to wire the RCX ACC up. There are two ways to wire the connection from the RCX DCC to the RCX ACC. Connect the Advanced Acknowledgement Circuit to Sensor Port 1 on the RCX ACC. The other end of the acknowledgement cable can either get wired directly to the 2x8 electric plate on the RCX DCC or to the track. If the switches (which need to connect to the RCX ACC) are close to where you locate the RCX DCC, then I typically wire it direct.to the RCX DCC. If the switches and the RCX ACC are quite a distance away from the RCX DCC, then I will typically wire them to the track. Now that we have the command signals wired between the RCX DCC and the RCX ACC we can start to wire up our additional hardware. In the example above, wire switch #1 to the motor output #1 on the RCX ACC, and switch #2 to the motor output #2 on the RCX ACC.
That now leaves us with the third RCX (which runs the automation program),and the ferris wheel to deal with. Take the RCX CODE and place it directly in front of the RCX DCC. Since the communication here takes place via infrared, they need to be line of sight to each other. Next wire the ferris wheel to the RCX Code motor output #1.
Starting Up
Now that everything is wired up, lets start up the RCX ACC, and put in run mode. Next start up the RCX DCC, and put in run mode. Finally turn on the RCX Code and have it run your automation program. Sit back and enjoy what you have created!
 Seibz
Seibz